A big uppercase HELLO to everyone! I am back and after a long time (yet again) I am going to write a tutorial. The thing I am able to achieve here is awesome for us computer vision researchers. Yes! you heard it correct, exciting stuff.


(Just a reminder) Ideally these should be compiled using the compilers you have and on your system so everything is set up accordingly. So these might not work for everyone out there, but still if you have a set up which comes close to the one mentioned below, you might be able to use these without any trouble.
The tools I have used to compile these:
-Matlab 2012b (64 bit)
-Microsoft Visual Studio 2010 (64 bit)
-Python 2.7.6 (64 bit)
The pre-compiled binaries (including the mex wrappers) can be downloaded from here
Setting up and using these libraries is similar to the instructions in the tutorial above.
I have been using OpenCV for quite sometime now. As good as it is for real-time computer vision applications, it can also be time consuming when it comes to exploring and implementing new research designs. Matlab on the other hand has always been flexible and a quick work around to achieve my research goals. The only problem, though, with matlab is that it is not real-time or even worse is that if you plan to implement code in OpenCV for real-time application, you would have to write the algorithms all over again as the usage of Matlab toolboxes is different than using the same methods in OpenCV.
Click Configure to specify the compilers for compiling this source code.

Select the compiler as Visual Studio 10 or Visual Studio 10 Win64 (in case you are using 64 bit binaries). Select use default native compilers and click Finish.
At this point CMAKE will check your system configurations, compilers and will start generating a code for you in the build directory. This might take a couple of minutes to complete, depending on your system specifications.
On completion of this step, you will see some values marked red and there will be some diagnostic output in the lower part of the gui.

At this stage make sure that both Python and Matlab binaries are detected (as highlighted above). Also, if you scroll through the diagnostic output you should be able to spot the following lines:
If everything is OK and similar to the output above, you can proceed by clicking on Configure to get rid of all the RED values. You may repeat this several times before you get all the values marked WHITE.

Once all the values are updated and marked WHITE click on Generate to generate the code. After the code is generated, you can close CMAKE.
Now comes the fun part, what if you can access OpenCV function calls within Matlab code? What if you can have easily transferable code from Matlab to C++? This is all possible now with the OpenCV 3.0 Dev including matlab mex wrappers, which really is a good big step in the right direction. So lets start compiling the code.
What you will need?
1. A copy of latest OpenCV 3.0 Dev source code from: https://github.com/Itseez/opencv
2. Latest CMake binaries: cmake-2.8.12.2 (current version)
3. A copy of Matlab (32 bit or 64 bit)
4. Latest Python 2.7.6 Binaries (architecture should be same as Matlab -> 32 bit or 64 bit): python-2.7.6.msi
5. Microsoft Visual Studio (32 bit or 64 bit)
Additional requirements
- Patience
- Lots of Patience
Optional
- A cup of coffee or tea (hahaha)
Some words on architecture
- In order to avoid all possible errors, it is extremely important that the architecture of all the libraries and compiler you use is consistent. For this particular tutorial, make sure that the version of Matlab, Python and Microsoft Visual Studio has the same architecture (i.e. all of them should either be 32 bit or 64 bit). I have compiled OpenCV using 64bit architecture (as my Matlab was 64 bit). Essentially the same tutorial might work with 32bit versions.Ok, I have these. What to do next?
The process which follows is a typical code compilation process using CMAKE to generate the source and Visual C++ to compile the binaries.
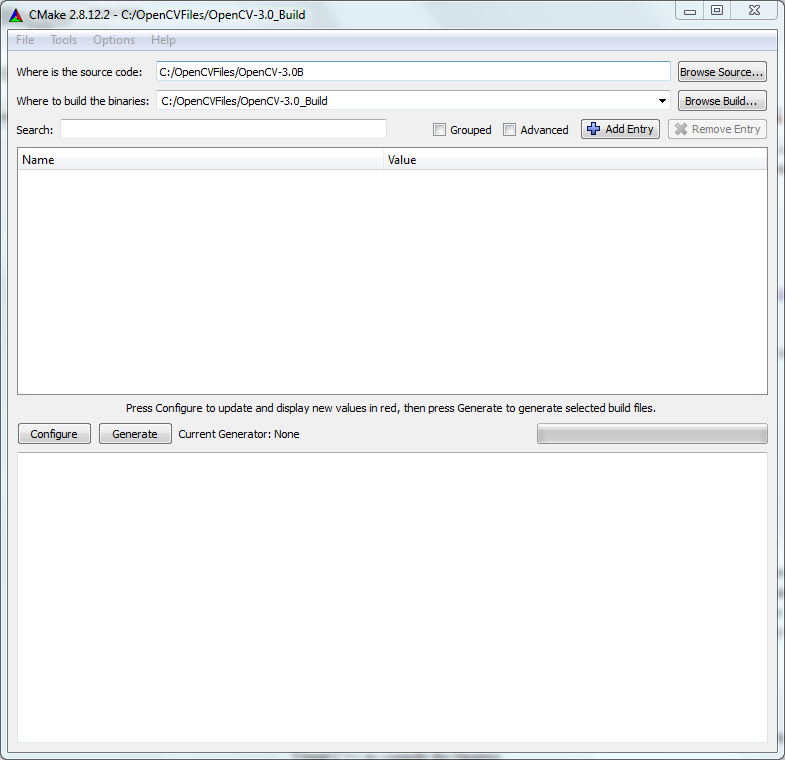
Open CMAKE gui, click browse source. Select the folder containing the above extracted OpenCV source code. Repeat the same process to specify build folder (using browse build option). For build version you can specify a new folder with a convenient location.
Generating the Code using CMAKE
First extract the OpenCV source to a folder, this folder will be used during compiling step. Next install both CMAKE and Python and make sure that you have a copy of Matlab and Visual studio installed. Also, as mentioned above, make sure that all the libraries and compilers used have the same architecture.Open CMAKE gui, click browse source. Select the folder containing the above extracted OpenCV source code. Repeat the same process to specify build folder (using browse build option). For build version you can specify a new folder with a convenient location.
Click Configure to specify the compilers for compiling this source code.
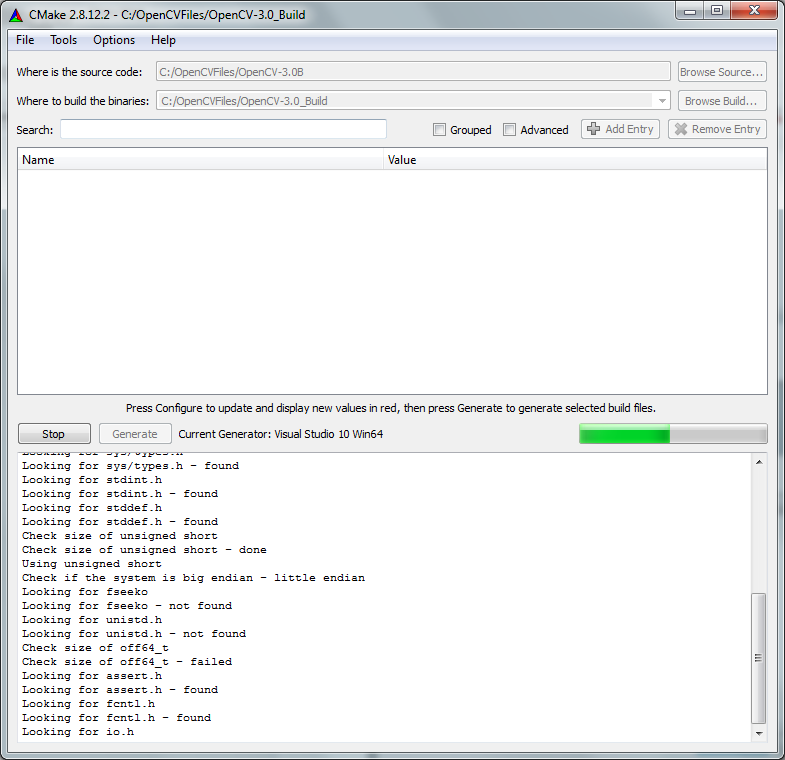
Select the compiler as Visual Studio 10 or Visual Studio 10 Win64 (in case you are using 64 bit binaries). Select use default native compilers and click Finish.
At this point CMAKE will check your system configurations, compilers and will start generating a code for you in the build directory. This might take a couple of minutes to complete, depending on your system specifications.
On completion of this step, you will see some values marked red and there will be some diagnostic output in the lower part of the gui.
At this stage make sure that both Python and Matlab binaries are detected (as highlighted above). Also, if you scroll through the diagnostic output you should be able to spot the following lines:
Found PythonInterp: C:/Python27/python.exe (found suitable version "2.7.6", minimum required is "2.7")
Found PythonLibs: C:/Python27/libs/python27.lib (found suitable exact version "2.7.6")
Found JNI: C:/Program Files/Java/jdk1.7.0_17/lib/jawt.lib
Found Matlab: C:/Program Files/MATLAB/R2012b/bin/mex.bat
VTK is not found. Please set -DVTK_DIR in CMake to VTK build directory, or set $VTK_DIR enviroment variable to VTK install subdirectory with VTKConfig.cmake file (for windows)
Warning: Matlab bindings will only be built in Release configurations
Warning: Matlab bindings will only be built in Release configurations
Trying to generate Matlab code
Trying to generate Matlab code - OK
Trying to compile mex file
Trying to compile mex file - OK
If everything is OK and similar to the output above, you can proceed by clicking on Configure to get rid of all the RED values. You may repeat this several times before you get all the values marked WHITE.
Once all the values are updated and marked WHITE click on Generate to generate the code. After the code is generated, you can close CMAKE.
Next stop: Compile Code
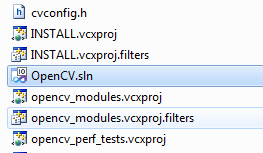
To compile the code, browse to the folder where you generated the build code. You will be able to find a *.sln extension project file named OpenCV.sln. Double click on this file to open it in Visual Studio.
In Visual Studio, select Release as build version from top drop-down menu.
Next start compiling the code by selecting Build-> Build ALL_BUILD from the build menu on the top. Remember in the start of this post I mentioned that you might need coffee/tea and a lot of patience? It was for this moment. So sit back and relax and let the Visual Studio do its work.
After the compiler finishes compiling the code, use the solution explorer to find INSTALL option. Select it by clicking on it once and then again select Build -> Build INSTALL from the build menu on the top. Once completed successfully you would have compiled and installed OpenCV binaries (including Matlab Mex wrappers) in a folder named install inside the build folder you specified in CMAKE. For me these were found in:
C:\OpenCVFiles\OpenCV-3.0_Build\install
If you have managed to come to this point with no errors, then congratulations!! You have done everything right! Now you have the OpenCV code compiled and ready to use within Matlab.
Wohooo! My first Matlab-OpenCV code
Before you can use all the OpenCV awesomeness in Matlab, you need to set your system Environment Variables to point at OpenCV Binaries. To do this follow the instructions in my previous post to add the path to bin folder to the Environment Variables. For my above examples this path is:
C:\OpenCVFiles\OpenCV-3.0_Build\install\bin
ALL DONE!
Open Matlab. Select Set Path and Add with Subfolders and browse to the directory named matlab inside the install folder. For the above example this folder is at:
C:\OpenCVFiles\OpenCV-3.0_Build\install\matlab
"Hello OpenCV!", said Matlab.
To check if everything is working fine, try the simple example below.
close all
clear all
% testing opencv basic funcionality
inImage = cv.imread('m.jpg');
cv.imshow('showImg', inImage);
Make sure you have the corresponding image in the same directory where your *.m file is located.
If everything works fine (fingers crossed!) you will be able to see the image in a HighGUI window.
ARGHHH!! I cant get rid of some compilation errors
If you are unable to compile the code because of some stupid errors that you cant understand then this section is for you. I am uploading the binaries I compiled, which might work for you.(Just a reminder) Ideally these should be compiled using the compilers you have and on your system so everything is set up accordingly. So these might not work for everyone out there, but still if you have a set up which comes close to the one mentioned below, you might be able to use these without any trouble.
The tools I have used to compile these:
-Matlab 2012b (64 bit)
-Microsoft Visual Studio 2010 (64 bit)
-Python 2.7.6 (64 bit)
The pre-compiled binaries (including the mex wrappers) can be downloaded from here
Setting up and using these libraries is similar to the instructions in the tutorial above.
Thats it for now! I will be back (hopefully soon) with more stuff.